Thursday, April 18, 2013

Recent Storm Photos...

Our storm season has finally come! These past few weeks I've been on several storm chases. Here are some of my personal favorites from these chases.

Enjoy!

-Ben


Saturday, March 16, 2013

Sharpening...

I love looking at photos that are sharp. I like picking out all the little details in images. Post processing has made it even easier to pull out more detail than ever before. Sharpening is one of the things I get asked about a lot. Sharpening is also one of my key adjustments I do when I process my photos. I decided to share with you some of the basic sharpening tools and effects that I use. If you have a different technique that you would like to share pleas post a comment. I always like to try new things with sharpening.

***Disclaimer I use an older version of Photoshop mainly because I don't need any other version for what I do. Some of these filters may be named differently.***


Basically there are four different sharpening techniques: Sharpen, Unsharp Mask, Smart Sharpen, High Pass Sharpen. Sharpening can be very tricky to get right. I recommend sharpening just before your print, or post on facebook, whatever. Sharpening should be the last thing you do to the image. The reason we do this is to avoid haloing or pixelattion from other filters or adjustment. Fix up your photo first, then sharpen. Sharpening is also really hard to get to the right amount. During the editing process our eyes get used to the sharpness of the image which makes it very easy to over sharpen the image. I always make a duplicate layer and toggle the sharpening layer on and off to compare from the original. This helps me keep my sharpening to a minimum while retaining important detail.


Here is what we will be working with today. This image was captured using my Nikon D700 and my 18-35mm lens. This is a very sharp lens and I get the most out of the 12 megapixel full-frame sensor with this combo. 


Here is a 100% crop of the unsharpened image. As you can tell this photo is already sharp, but I want to sharpen for printing purposes here.

 1: Sharpen
Filter>Sharpen>Sharpen

100% crop using the "Sharpen" filter. This is a very limiting filter You can not change the parameters of the sharpening. Often times this leads to more noise (grain) in the image. It also creates a flat effect on the image. I actually don't ever use this filter, but I felt it necessary since it is one of the most popular way of sharpening a photo. 

2. Unsharp Mask
Filter>Sharpen>Unsharp Mask

Unsharp Mask is a much better sharpening tool. It males a nice even sharpening throughout the image. This filter was designed for scanned documents and film not for digital images. I used this filter a lot when I first started out using photoshop.


This is the Unsharp Mask menu. The menu is made of 3 components Amount, Radius, Threshold. Amount controls the degree of sharpening applied to the image, Radius controls the radius of the sharpening pixels (I always like smaller radii to avoid haloing around the edges) and Threshold controls the level of  edge pixels to be sharpened.. Moving this slider can soften some of the edges to avoid haloing.


3. Smart Sharpen
Filter>Sharpen>Smart Sharpen

This is by far my favorite form of sharpening. This was designed with digital photographs in mind. This (in my opinion) creates the most effective sharpening effect. Smart Sharpen is a more complicated and involved tool, but the results it produces make it worth the extra work. 

See the menu has a lot more options. The fist step to Smart Sharpen is to change the "Remove" box to Lens Blur. Just like the Unsharp Mask we change the amount, radius, and threshold (available in the advanced menu option. This allows you to control the specific highlight/shadow clop, radius, and tonal range. This can really help when working with photographs that already have higher noise levels.) Also make sure you check the "More Accurate" box.

It takes a little longer to render, but it is a better result.

4. High Pass Sharpening:
Filter>Other>High Pass

Most people don't know about High Pass sharpening this product isn't even featured under the sharpening window. High Pass sharpening is great for getting detail in the softer parts of the image. Like the Sharpen filter it creates a flat effect. 

The High Pass menu can be a little confusing. The way it works is a 50% gray fill is placed over the image and the radius adjusted for the desired sharpening effect. Whatever shows through the gray is the area that sharpens. This is excellent for horizons, lines, and softer areas in the image. 

Once the filter is applied you will need to change the blending mode. In you layers palette  there is the layer blend mode (shown in red box). Change the filter layer to "Overlay or Soft Light" this sharpens the image but adds very minimal noise (grain). One last thing after you apply your sharpening layer change the blend mode to "Luminosity" this will get rid of any extra haloing or fringing on the sharpened edges. 


High Pass worked well to sharpen the horizon in this image. 

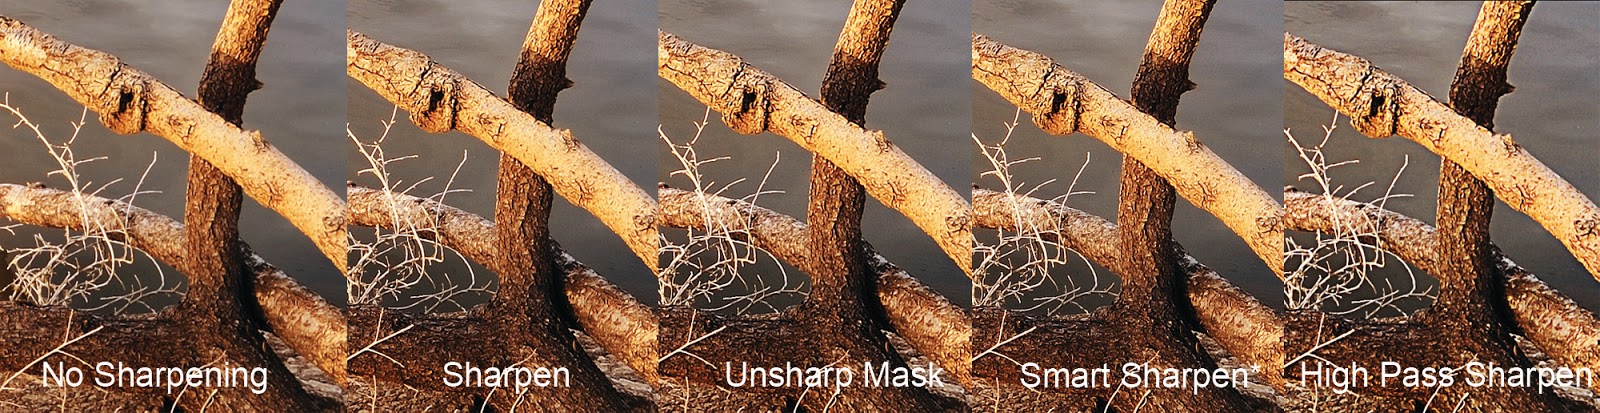
Here area ll the images compared to each other. My personal favorite is the Smart Sharpen.


Conclusion:

I found the most effective form of sharpening to be the "Smart Sharpen" tool. It brought out the most detail  while still controlling the noise (grain) levels. However, if I was needing to sharpen the entire image I would use the High Pass.

Smart Sharpen is great for bringing out little details. 


High Pass sharpening works best when sharpening the overall image..

Monday, March 4, 2013

Train in Harrold and Beautiful Texas Weather...

Infrared false color of the Bolton's Grain engine.

This past Sunday I drove to Harrold, TX in search for a photographic opportunity. I was turned on to a location by a customer of mine where a very colorful train was found. The Ol' Bolton's grain Train (as I've decided to name it) was sitting just behind the grain elevators. I managed to get some good captures of the train and I even tried some infrared (thereafter I broke my infrared filter). The day didn't end there, though. It was a beautiful day in northern Texas and I captured some really nice local landscape work. The only problem was the wind! Needless to say my camera did sustain some damage and I ended spending most of the evening picking dust/dirt out of my teeth, but it was well worth it.

Enjoy!

-Ben

I wasn't quite sure what this building was for, but it certainly was colorful. I assume it was some sort of break room. It had a basketball hoop bolted to the back.
I always enjoy infrared photography. I especially enjoy it in black and white.
A little sepia tint to this one.
Black and whte
False color. Since most of the train was red when I swapped the red and blue channel the red turned blue and the blue turned red. 
Here it is in color. It was a very vibrant train.
I had to pull a lot of shadow detail out for this one. I couldn't get a great angle for this side because the grain elevators were in the way.

Afterwards I went down to Middle Lake to see what was new there. Normally I have to stay on the east side of the lake because the dirt roads are impassible when it rains. We haven't had rain in a while, I was able to drive to the other side.

Our lack of rain is very evident in this photograph. These "trees" are usually under water...

Waving at the camera.

This was where I swallowed all the dirt and dust. The wind was a constant 25mph with gust  reaching as high as 48mph! I was also positioned directly in the path of the blowing dirt/sand. The wind was a strong S/SW wind.

Closer to the sunset now I moved to the south side of the lake to photograph  some of the "golden hour " light.

Also some pre-sunset/landscapes shots.


This was actually at the same time as the other pre-sunset shots were taken.. This is using my new  graduated  wine filter. It turns almost any sky into beautiful sunset light! 

Monday, November 12, 2012

Wichita Mountains Trip 2012...


Well its here--November. It seems like just yesterday we were wearing our short sleeved clothes and finishing out our summer tans. Actually that was about a week ago. We have broken/tied with a few record high temperatures so far this month. Another La Nina year brought us less precipitation and warmer temperatures. This past Sunday was an exception, however. A strong cold front was pushing its way into TX/OK and would bring a familiar blustery wind that reminds us why we stay at home curled up next to the fireplaces/space heaters. Winds sustained around 25mph and gusts as high as 40mph certainly doesn't sound like good photography weather. For whatever reason we decided to forgo basic survival instinct and brave the chilly weather (remember it was 86 degrees last week) in pursuit of the last fall colors in the Wichita Mountains Wildlife Refuge. I have been to the mountains a few times for fall photos and almost every time I've been too late. Story of my life...

My mother and I loaded up our gear (ie camera equipment, jackets, sunglasses, McDonald's milkshakes...y'know just the essentials) and drove out towards Lawton, OK. We arrived at our destination and began scouting for potential locations for sunset photography. Lake Quanah Parker has always been a reliable location for sunset photos. After driving around and not really seeing much of anything (occasional Northern Harrier, bison, and other typical refuge wildlife) we settled on exploring Elk Mountain and the Sunset trail. We hiked about halfway up for some pre-sunset photos.

On top of one of the boulders off the Sunset trail. We had a great view of the park and a nice warm light over the rocks.
Not a bad view from up here.

We had good position on some of the other mountains, but the sun was still very high up . A lot of  my shots like this had sun flare and other problems. The solution? Get down low and use the terrain to my advantage. I used the rock on the right side to block out the sun.

The backlight worked well against the cactus and other vegetation.

Lens flare was a real problem facing this way, but the scene couldn't go unrecorded.


While we were in great position for some sunset photography I still had my hopes set on Lake Quanah Parker. Around 4:15 or so we start to head towards the lake. But on our way there I have to stop and photograph some wildlife.

Bison that is. There were about five bison just off the side of the road.

Every once in a while they would turn themselves into the good light...

...but most of the time I was having to deal with the strong backlight. I used to in my favor for this shot.

This came to me as a surprise. The bison just laid down (I assumed he was just resting) and out of  nowhere he started rolling in the dirt. You can see the dust cloud pretty well again because of the backlight. I wasn't expecting this and I was unprepared. My shutter speed was too slow which caused the blurry leg.

 More of the bison.

He laid down again and opened his moth. I'm  not sure why, but I took the photo anyways.

This is one of my favorites from that evening. I was lucky to capture the bison sticking his tongue out at me. As if he was challenging me to capture his expression.

The bison started to get closer to our vehicle. This was a challenging exposure . Half of the bison is in shadows and the other half is in direct sunlight. I metered right at the transition point and over exposed by a +1/2 stop. I was able to keep detail in the highlights while retaining the shadows.


It was almost time for the sun to set and we were still planning to go to Lake Quanah Parker. We had a little time before the "golden hour" so we went to explore around the Osage Lake trail. We searched for fall foliage--which was the purpose of this trip. We have been to Osage Lake before, but we couldn't remember what was down there. What's down there? At that time a whole lot of nothing. We didn't even see a lake. One thing I did run in to was the fall foliage we were looking for. Was it a spectacular cluster of red, gold, and orange leaves? No. But, there were several areas where there was still color...and that is what telephoto lenses are for.

I captured this shot at the Osage Lake parking area. I used a (borrowed) Sigma 150-500mm lens  for this shot. The telephoto lenses compress the scene. The dead tree in the foreground is a lot farther away from those trees in the background.

Probably my favorite capture of the trip. The color in here is crazy. Before I get accused of manipulating the colors let me clear--I used a long exposure (aprox 2sec) to absorb all the colors. I had to take several shots as the wind kept blowing and rendering the leaves a blurry mess.


You just gotta love scenes like this!


I shot this one with my old Nikkor 135mm f/2.8 AIS lens. This lens is almost 40 years old and its a sharp as  a tack!

I loved that little toppled stump in the foreground up against the trees in the background.


The sun is setting just at the horizon now and we blast our way to Lake Quanah Parker, but we're a little too late the sun sets behind the mountains. But I still manage to capture some long exposure shots in the dusk. By this time the wind had picked up to 30mph with some stronger gusts, and wind coming off that lake was COLD!

Mountains in the sunset light


Shooting across the other side of the lake I see some bison coming up for a  evening  drink.

I enjoyed watching the shadows and light dance around the face of the mountain.

I think it was around this shot I lost the feeling in my fingers. Oh well, it was worth it.

With our fingers nearly frozen and our pride in shambles we submit to Mother Nature's wintry embrace and retreat back to the warmth of our heated vehicle. I thought about getting some night shots maybe with some star shots, but it was too cold. Driving out of the refuge I ask my mother to stop for just a few more shots and I capture the silhouette of the mountain range.  

The clouds add some scale to the mountains and bring a nice balance to the overall composition.

What a great way to end the day of a long overdue photo journey.

I want to say thank you to my mother for driving me and sharing in the experiences that day.


About Me

My photo
I am 25 years old and I have been a photographer for 11 years now. I love nothing more than taking my camera out on a photo shoot with me. I mainly focus on nature photography.That is where my passion is. I love looking at all of God's wonderful creations and capturing them in the photographic medium. I have won awards and have received special recognition for my photography. It is my calling and my passion!